In this article, you will learn the following information:
- Basic information about reviews
- How to find a review?
- How to add/edit reviews received from other sources?
- How to access the detailed review view?
- How to add/edit a note to the review?
- What is the review status and how to change it?
- How to create a custom review status?
- How to add a tag to a review?
- Auto-tagging for classification/filtering of reviews
- How to set the review sentiment?
- How to assign a person responsible for the review?
- How to view the review change history?
- How to know if a review is already being handled by another employee?
- How to hide reviews?
- How to download the report on reviews?
This section displays reviews that are collected from all available catalogs. You can answer them and send complaints from your personal account without going to the source each time. The average rating of reviews for all companies is also shown and it is possible to add reviews received from other sources (from the client's words, through a call center, social networks, etc.).
Google and 2GIS (URBI) catalogs have their own rules for publishing reviews and responses. You can learn more about them at the following links:
To access the section, click on Reviews Center and select Reviews.
The Reviews page opens. Filters are displayed at the beginning of the section and on the right; you can learn more about them here.
Attention!
- The total number of reviews may differ from the value in the Reviews Summary block in the Overview section, as the summary does not account for reviews without text. To compare values, set the filters to Review Content → Without Text.
- In this section, reviews can come from two sources: Google Business Profile and Google Maps. Such display is not an error and occurs due to the linking of the Google catalog. If none of your companies are verified, reviews will be collected under the Google Maps catalog. After verification, they will be displayed under the Google Business Profile catalog. If you have both types of companies, two catalogs will be shown until the remaining locations are verified. Consequently, you will not be able to respond to reviews from Google Maps.
- On Yandex, the review rating and the review text undergo separate checks by the catalog. As a result, the rating may pass the verification faster and be published earlier than the review itself. For this reason, the review may also be assigned the status Review Modified.

Basic information about reviews
At the beginning of the review, you will see the name of the client who left it, the review rating, the publication date, the catalog, the company address, and the review text.
- Next to the catalog name, there is a button with a link to this review in the source.
Attention!- For the Yandex catalog, the link can lead either directly to the review or simply to the company's card.
- If the review has been deleted, it will be impossible to access the catalog.
- In the lower left corner, there is a button to Reply or Add a reply. You can learn how to respond to reviews here.
- The status of the review response is displayed:
- Response sent and awaiting publication (if the response has not yet undergone moderation on the platform).
- Response published (if the response has already been published on the platform).
- In the lower right corner, the complaint status is displayed if one has been submitted. If not, you will see a button to Report. You can send a complaint about the review from your personal account only on Yandex, 2GIS and Google. For other services, complaints are sent from the accounts on their respective platforms.
Attention! For the 2GIS catalog, it is impossible to send a complaint without a text review. - The user can attach photos to a review.
Attention!- Photos from Google reviews are not displayed in the personal account.
- In Yandex.Maps, both photos and videos are displayed.
- Below the review text, there is a button to add tags.
- When clicking on the three dots in the upper right corner of the review, a dropdown menu will open with the following actions:
- Open in a new tab. This review will be opened separately in a new tab.
- Copy the review text.
- Copy link to review. You can paste it into the browser's address bar, and the detailed view of this review will open.
- Add a note.
- Assign responsible person.
- History. You can view the history of changes to the review.
- Next to the three dots, there is a field showing the review processing status.
- If the text of the review exceeds 1000 characters, then part of it will be hidden.
- The review author may not be displayed, or his or her name will be shown with asterisks (*). This is done because in some countries personal data protection laws prohibit the display of the author.
If a client changes a review for which a response has already been given, you will see the status Outdated on the response.
After leaving a review on the catalog, it takes some time for it to appear in our personal account. To find out the date of the review collection, you need to hover the cursor over the date of its publication in the source.
Attention! If the review's publication date is later than the collection date, it was most likely edited by the customer. To view the change history, click on the three dots and select History.
Only reviews collected through the 2GIS (URBI) service that have not yet been confirmed by the catalog and are not displayed in it are collected in the personal account. They will be marked as The review has not been confirmed. You can respond to such reviews, and a response generated by the neural network is also provided. If such a review is left without text, it cannot be responded to.
In the 2GIS (URBI) catalog, there are reviews from the booking service. In the image below, you can see how such feedback will be displayed in the Personal Account.
All reviews (both negative and positive) left through QR codes are automatically tagged as follows: QR code: the name of the code.
Negative reviews will be displayed under the Reviews Generator catalog. Positive reviews are left by users in the catalogs. They will appear in the personal account after being collected from the sources.
For each review from the App Store catalog, the following information is displayed:
- App version.
- Platform.
- App name.
- Locale.

How to find a review?
Use the search field to find the review you need. You can search by the text of the review, the reply, or the author's details.
Attention! Search by phone number is only possible in international format, for example, +48 00 000 00 00.

How to add/edit reviews received from other sources?
To create new reviews in your personal account, which were received during the processing of incoming information such as calls from the call center, messages via email, social networks, and other sources, click on the plus icon next to the download report button.
To edit a review, click on the three dots and select Edit a review.

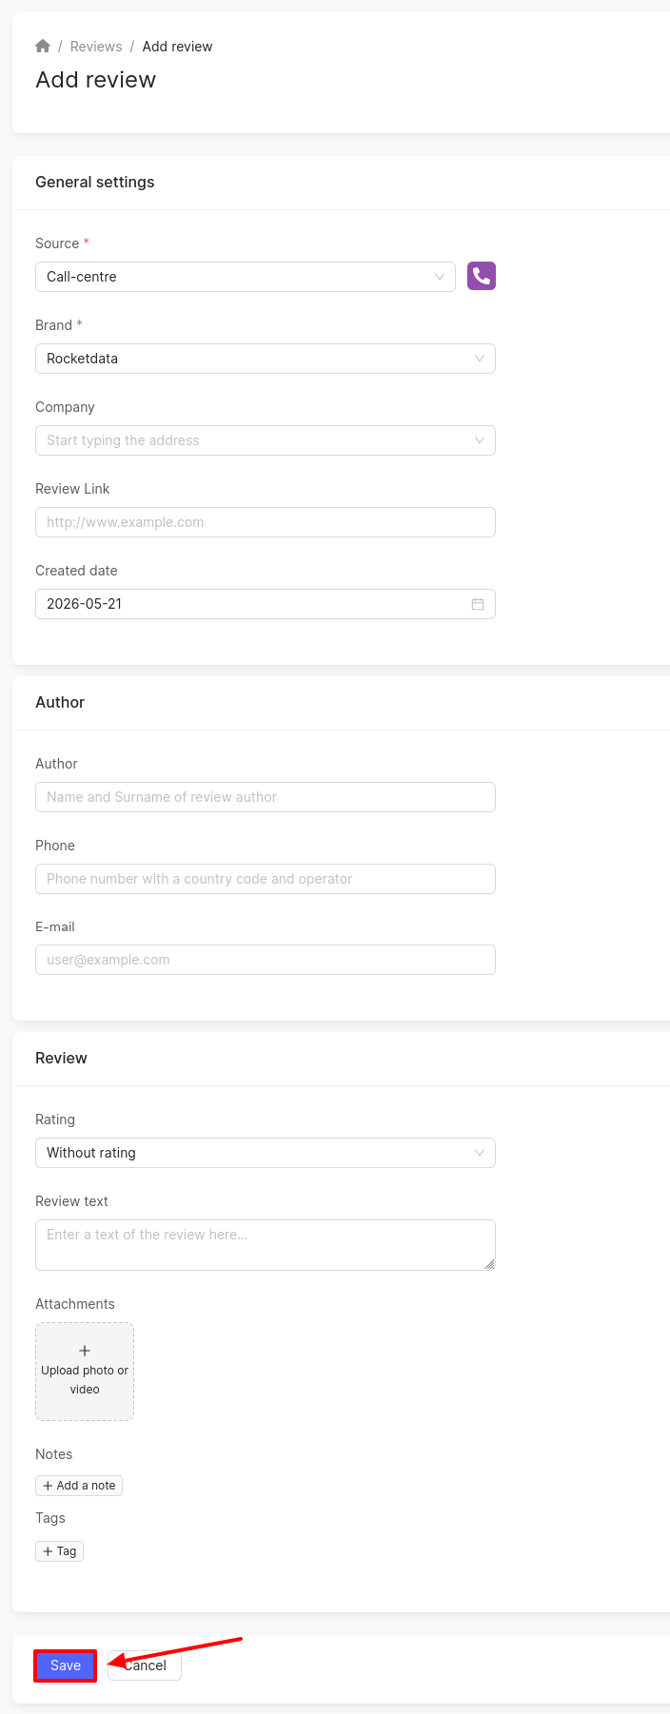
The window Add/Edit Review will open. Fields marked with an asterisk (*) are mandatory.
Fill in the following fields:
- Select the source of the review:
- Call center.
- Book of complaints and suggestions.
- Email.
- Mobile app.
- Questionnaire.
- Social media.
- Telegram.
- From the client.
- Web widget.
- Whatsapp.
- Select the brand.
- Select the company.
- Specify the link to the review where it was left.
- Choose the date of the review creation.
- Enter the full name of the review author.
- Enter the phone number of the author.
- Provide the author's email address.
- Select the review rating.
- Enter the text of the review.
-
If necessary, upload a photo or video:
- The photo size must not exceed 5 MB. Allowed formats: JPG, PNG, JPEG.
- The video size must not exceed 10 MB. Allowed formats: MP4, MKV, FLV, 3GP.
-
If necessary, add a tag or a note.
- Click Save.
Attention! At least one of the following fields must be filled out: Author, Phone, Rating, Review text.
The added review will be displayed in the list of all reviews.
How to access the detailed review view?
To access the detailed view of a review, click on its text or on the three dots and choose Open in a new tab.
A page will open that retains all the functionality available in the main section, as well as allowing you to view the full text of the review and all attachments.

How to add/edit a note to the review?
To add a note to a review, click on the three dots and select Add a Note.
A window will open where you can enter the note text and click Save.
Attention! The number of characters in the note should not exceed 2000!
The notes will be shown in the BrandWizard personal area only from the newest to the oldest one. To display them on the page, you need to click on their quantity. In each entry, the surname and first name of the employee who added it will be displayed, along with the date and time of creation. Instead of the employee's surname and first name, BrandWizard may be indicated. This means that the note was left by our staff member.
To edit or delete the note, click on the three dots in the note field and choose the desired action.
Attention! A note can be edited and deleted by its author only.
What is the review status and how to change it?
New reviews in the personal account have the Not Processed status by default.
In order to change it, you need to click on the field in the bottom right corner of the review, select the desired option from the drop-down list or find it through a search:
- Processed.
- Not processed.
- Not confirmed.
- Coordination.
- In process
- Decided.
- Request information from the client.
- Providing bonuses for the client.
- Answered via catalog.
- Abuse was sent.
- Review was deleted.
- Review was changed.
If a response has been sent to a review (using neural network, auto-reply, template response), the status will automatically be set to Processed.
Examples of some cases where setting the status may be useful:
- When it is not possible to immediately respond to a review and it is necessary to find out what happened and what to do in this situation, you can set an In Process status or a more specific Request Information from the Client status explaining the stage of work with the review.
- When the answer has been given in the catalog, you can set the Answered via catalog status, so that you do not go to the service again later or leave another answer. It is useful for those reviews that initially do not have a Reply button.
- When a complaint has been left for a review from your personal account or on the catalog, you can set the Abuse was sent status.
You can delete only the following review statuses:
- Not confirmed.
- Coordination.
- In process
- Decided.
- Providing bonuses for the client.
- Review was changed.
The remaining statuses are system ones and cannot be deleted.
To delete a status, hover over it and click the cross (×) that appears.
In the window that opens, select the status that will replace the deleted status on this review only. Click Replace and Delete.
Attention!
- The deleted status will disappear only from your status list. Other employees will continue to see and use it.
- The replacement will only apply to the review on which you are performing the deletion. On all your other reviews where this status was previously set, it will remain. The status itself will disappear from the dropdown list, and you will no longer be able to select it for new or edited reviews.
How to create a custom review status?
Create custom statuses to accurately classify reviews and manage workflows more effectively. To do this, click on the status selection field, then press the Create Status button.
Attention! Creating and deleting custom statuses are only available to users with the Owner role.
In the pop-up field, enter your status and click Save.
To delete a status, click the cross icon.
In the window that appears, select the status to which reviews with the deleted status will be transferred. Click Replace and Delete.
After deleting the current status, the process of replacing it will begin. The selection of statuses will be temporarily unavailable. To continue working with statuses, please refresh the page.
How to add a tag to a review?
If a mandatory tags group was created in the Tags section, a notification about the need to add a tag from that group will be displayed on the reviews. For each review, you will need to select at least one tag from each mandatory group.
To add a tag for a review, click on Tag.
In the window that opens, choose the necessary tag and click Apply. Tags can be found by name and filtered by groups. The name of the group to which the tags belong is displayed next to them. If a tag does not belong to any group, nothing will be displayed.
To configure tags, click on Go to tag setup. You can read more about it here. If a new tag was created when going to tag setup, to have it displayed in the selection window click Refresh tags list.
Auto-tagging for classification/filtering of reviews
To simplify the search and analysis of reviews, a system of automatic classification of reviews using tags has been implemented, which are assigned based on the analysis of the text and context of the reviews. Such tags are available for the main business industries:
- Retail.
- Fuel station.
- HoReCa.
- Food.
- Auto.
- Maintenance.
- Health.
- Pharmacy.
- Beauty.
- Finance and insurance.
- Tourism and hospitality.
- Sport.
- Deliveries and logistics.
- Realty.
Additionally, the company must have a main category specified from the list. Auto tags will be absent if you have exception categories besides the main category. You can find out about them here.
Tags are considered automatic (they are available for all fields regardless of the category):
- Responsible: name/email of the employee - displayed if an employee is assigned to the review.
- QR code: name of the code - if the review was left via QR code.
Automatic tags will be displayed in blue. Regular tags will be in gray.
Automatic tags display the sentiment (positive, neutral, negative) of the review:
- Tags with positive sentiment are shown in green.
- Tags with neutral sentiment are shown in yellow.
- Tags with negative sentiment are shown in red.
Regular tags are displayed in gray.
If necessary, the sentiment of the tags can be changed. To do this, click on the tag and select the desired sentiment from the dropdown list.
| Filtering reviews by auto-tags is possible in the side filter in the Tags includes field. To do this, select Autotags from the dropdown list and click OK. |
|
To disable the display of autotags, click on the gear icon and select Disable autotags. To re-enable autotags, do the same and select Enable autotags.

How to set the review sentiment?
The sentiment of a review can be seen next to the review rating. If necessary, it can be changed. To do this, click on it and select the desired sentiment from the dropdown list.
How to assign a person responsible for the review?
To assign a responsible person for the review, who will reply to it, send complaints, set tags, change status, etc., click on the three dots and select Assign Responsible person.
Attention! Responsible person assignment does not mean that he or she is the only person who can do some actions with this review. Other employees can also work with the review.
A window will appear where you can choose the relevant employee. You can find them using the search field by name/email. Then, click Apply.
How to view the review change history?
To view the review change history, click the three dots on the review and select History.
A window will open showing the complete timeline of actions on the review:
- Review added to the catalog.
- The review was removed from the platform.
- The review was restored on the platform (some catalogs can restore deleted reviews).
- The review was moved to confirmed on the platform
- "Username" sent a complaint about the review.
- Complaint sent automatically.
- Complaint status updated.
- "Username" appointed a responsible person.
- "Username" changed the responsible person.
- "Username" removed the responsible person.
- Response to the review published on the platform.
- "Username" changed the reply to the review in the account.
- "Username" deleted the reply to the review in the account.
- User "Username" added tag(s).
- User "Username" removed tag(s).
- User "Username" created note.
- User "Username" changed note.
- Note deleted by user "Username".
- "Username" changed the status.
- "Username" changed the aspect sentiment.
- "Username" changed the review sentiment.
- The review text and rating have been changed.
- "Username" changed the status.
- "Username" changed the aspect sentiment.
- "Username" changed the review sentiment.
- The review text and rating have been changed.
How to know if a review is already being handled by another employee?
If an employee has already started processing the review, you will see a notification about this directly on the review. It appears automatically when any of the following actions are performed:
- Assignment of responsible employees for the review.
- Adding or editing a reply (including using ready‑made templates and a neural network).
- Bulk editing — from the moment you check one or more reviews (in the upper‑left corner of each review).
- Submitting a complaint on the review.
- Changing the review status.
How to hide reviews?
You can temporarily remove an unwanted review from the public feed and from statistics without permanently deleting it. To do this, click the three dots and select Hide review.
The average rating will be recalculated without taking this review into account, and you will not be able to reply to it or submit a complaint (the buttons will be hidden).
The review will display a Review hidden label. You can restore the review at any time — with its full history and reactivated buttons.
How to download the report on reviews?
To download the report on reviews, go to the Reviews page and click Download report.
Attention! You can download the report on reviews with the necessary filters. For instance, download the report for a certain period of time. In order to do that, on the Reviews page use filters to set up the required time period. Learn more about filters here.

All reports (except Full upload of reviews (old version)) can be downloaded in a standard format or customized to suit your needs.
How to download a standard report?
In the window that opens you will see 5 reports to choose from:
- Full unloading of reviews (new version). Unloading of all brand reviews and reviews by location with their content and responses.
Attention! The fields in this report may be updated. - Full unloading of reviews (old version). Unloading of all brand reviews and reviews by location with their content and responses.
Attention! The fields in this report will no longer be updated.
You can find out the difference between the old and new versions here. - Review statistics by brand and city (the report provides statistics on reviews only by location: how many there were, which ones and what rating reviews have for each brand and city).
- Response statistics by brand and city (the report provides statistics on responses to reviews only by location: how many reviews there were in total for each city or point of sale, how many reviews were answered, what was the average response rate to a review)
- Rating statistics by source (the report shows statistics of reviews only by location: what was the rating of reviews for the selected period in the sources).
Attention! For this upload, only the filter by company is used. The rating for the day is the rating for yesterday in the company’s card on the source.
If filters have been installed on the reviews page, they will be applied when downloading the reviews report. Information on this will be displayed at the top of the reviews upload window.
Only for full upload you can download additional data: Feedback report or Tag report. To do this, select the necessary checkboxes.
Comment output format (only for the new version of Full export)
For the Full unloading of reviews (new version) report, you can choose how comments (replies) to a review will be presented in the file. Below the Download name field, a Comments format toggle will appear with two options:
- By rows (default). Each comment is output as a separate row: one review with several comments takes up multiple rows. This format is suitable for viewing and regular work with the file.
- By columns. Each review occupies a single row, and its comments are spread across separate columns: Comment 1 — Text, Comment 1 — Author, Comment 1 — Date, Comment 2 — Text, and so on. This is convenient for loading the export directly into BI systems (Power BI, Tableau, etc.) without manual file processing.
How the By columns mode works:
- The number of column groups is determined by the review with the highest number of comments in the selection. For example, if one review in the selection has 5 comments, the file will contain 5 groups of columns (Comment 1–5).
- For reviews with fewer comments, the extra cells are left empty.
- Comments are displayed in chronological order — from the oldest to the newest.
Then click on Request. The review report will be sent to the email address specified in the Personal Account section Notifications → Email Notifications. You can find more information about the Notifications page here. A description of the downloads of reviews can be read here.

How to create a custom report?
Click the settings button next to the desired report.

In the window that opens, set the parameters:
- Download name — enter a name for your report variant.
- Export fields — check the boxes for the columns you want to include in the export.
- Tags format — choose one of the options:
- Comma-separated in one column — all tags will be listed in a single cell.
- Each tag in a separate column — a separate column will be created for each tag.
- Autotags format — configure similarly to regular tags (if auto-tags are used).
- Additional data — only for Full upload of reviews (old version): you can add Review report and/or Tag report by selecting the corresponding options.
- Column order — in the preview area you can change the column order by simple drag and drop: hover over the column name, hold down the left mouse button, and drag the column to the desired position.
Click Save.
The new custom report will appear at the end of the export list. You can edit or delete it at any time.
To get the file, select the saved report and click Request. The report will be sent to the email address specified in your account settings under Notifications → Email Notifications. You can find more information about the Notifications page here. A description of the downloads of reviews can be read here.
Important! Full upload of reviews (old version) does not support custom settings — it can only be downloaded in the standard format.

You can learn about the new review design further.