In this article, you will get acquainted with the following information:
- How to access the detailed photo view?
- History of photo and video changes
- How to change the status of a photo or video?
- How to add a tag to a photo or video?
- How to filter photos and videos?
This section displays all the photos/videos (including images in gif format) that have been uploaded by the owner and the client on the Google, Yandex and 2GIS (URBI) catalogs. Here it is possible to send complaints about photos/videos from all sources in one click.
Google and 2GIS (URBI) catalogs have their own rules for publishing photos and videos. You can learn more about them at the following links:
Please note!
- In this section, logos and cover images will not be displayed for the Google catalog.
- Google does not always show all photos in your location’s card. We collect all images from the catalog related to your company, so there may be situations where you submit a complaint about a specific photo in your account, it gets rejected, yet the photo is absent from the company's listing. In this case, the image remains in the user’s card with a marker indicating your location. Additionally, hidden photos may appear in your company’s gallery. Unfortunately, these are features of Google’s platform, and we have no influence over them.
- For the Google catalog, videos not present in the catalog itself may be displayed, including potential duplicates. This is because Google provides us with all videos uploaded by users without exception, and we cannot control this process. However, it’s important to note that the catalog does not publish all videos. As a result, if a user uploads two identical videos, both will appear in your account, but only one of them may be published in the catalog.
On the Photo & Video page you can:
-
View photos/videos uploaded by the owner and the client.
-
Filter photos/videos ( by source, status, tag, time period).
-
Submit a complaint about a photo/video.
-
Delete a photo/video.
To open the Photo & Video page, you need to click on Photo & Video in the menu box. Attention! If new photos or videos have been uploaded, the quantity will be indicated next to the field.
Attention! If new photos have been uploaded, the quantity will be indicated next to the field.
If you have not yet purchased a license for this functionality, a page will open where you can activate a free trial period for 14 days. To do this, click on Try for free.
A window will open indicating the duration of the trial period. Click on Connect.
After that, the online Photo & Video section will be displayed. To purchase a license, click on the corresponding button.

If you have already purchased a license, the section will open without displaying the trial period.

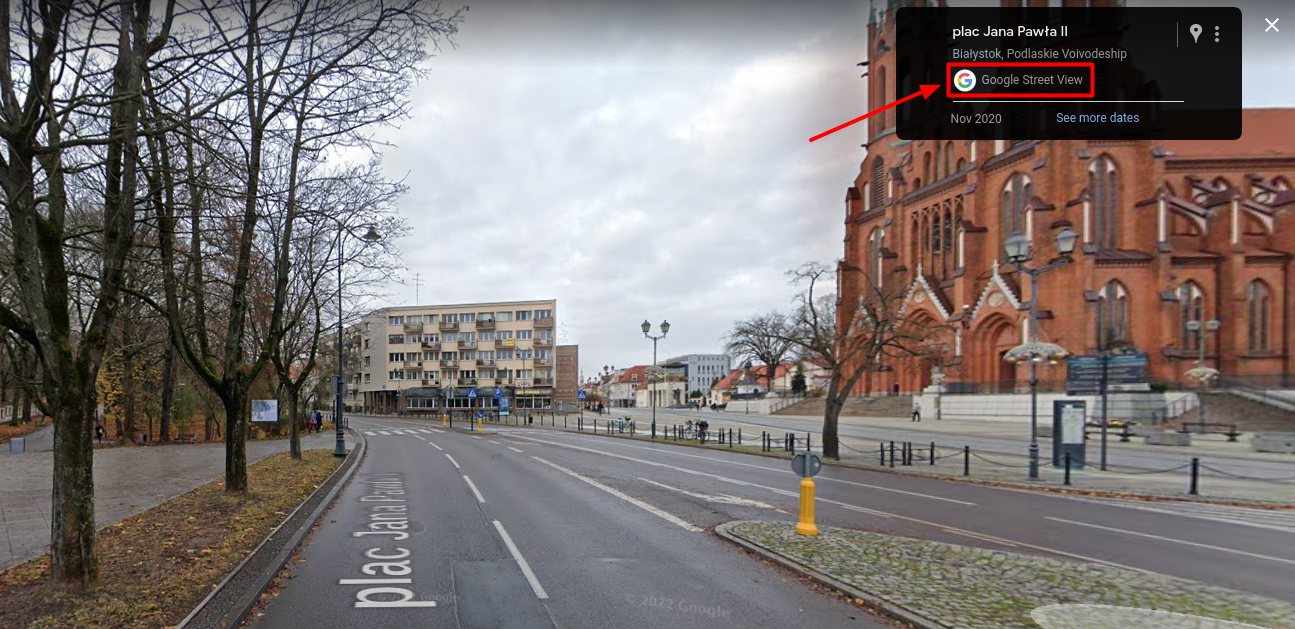
Attention! If photos are provided by the separate Street View service of the Google Maps platform (Google Street View), which displays street photos and panoramas, such images will not be collected in the personal account.
How to access the detailed photo view?
Click on the photo to open the detailed view.

To watch the video, go to the corresponding tab and click on it.
The Photo Info/Video Info page opens, where you can:
- View and edit the status of the photo/video.
- See the date the photo/video was uploaded.
- Find out the source to which the photo/video was uploaded.
- Open the original photo/video.
- Open the photo/video in the company card in the source.
- Add a tag to the photo/video.
- Find out the address of the company for which you uploaded photos/videos.
- Complain about a photo/video.
- Delete photo/video (available only for images uploaded by the owner).
- View the interaction history with the photos/videos.

History of photo and video changes
On the Photos & Videos page, just below each image or clip, you’ll find a change timeline that records every key event:
- When the file was collected by the system.
- When and by whom the deletion request or complaint was sent.
- When and by whom the status of the photo/video was changed.
- When the platform actually removed the file.
- Any other actions performed on the item.
For the Delete and Report actions, the timeline shows a user icon. Hover over this icon to see the name and e-mail address of the person who carried out the action.
Please note that in the Google directory, some company photos and videos may temporarily disappear from the profile and then reappear. Unfortunately, this is a characteristic of how Google works, and we have no influence over it. In such cases, if photos or videos disappear, a record of their deletion will be shown in the interaction history.

How to change the status of a photo or video?
All photos/videos are displayed with the status New. To change the status to Viewed, click on the Edit icon and select the desired option from the dropdown list.

The status is displayed on the photos/videos on the Photo & Video page.

You can change the status on multiple photos/videos at once. To do this, click on Select on the Photo & Video page.
Then select the required photos/videos and click on Viewed. You can also select all media using the button that is displayed at the bottom of the screen.
How to add a tag to a photo or video?
To add a tag, click on New Tag in the detailed view of the photo or video.

In the field that appears, enter the tag name, then click Enter.
- If tags have already been added to another photo/video before, they will be displayed in the dropdown list.
- If tags are added for the first time, then No Data will be displayed in the drop-down list.

The added tags will be displayed on the Photo & Video page when the mouse cursor hovers over the photo/video.
How to filter photos and videos?
In the page header, you can sort by the following filters:
- All photos (only photos will be displayed).
- Videos (only videos will be displayed).
- Owner (this filter sorts only photos).
- Customers (this filter sorts only photos).
- Selected (only the photos or videos you have chosen will be displayed).

The Selected field will become available after clicking on Select and choosing the necessary images/videos.
You can also select all media using the button that is displayed at the bottom of the screen.
To go to filters, click on the Filters icon.
The Filters window opens on the right.
To filter by source, click on the Sources field and choose the service you need from the drop-down list.
To filter by status, click on the Statuses field and choose the one you need from the drop-down list.
To filter by tag, click on the Tags field and choose the tag you need from the drop-down list.
Attention! If tags were not added to the photo/video earlier, they will not be in the drop-down list and filtering by tag is impossible.
To filter by time, in the Time Period field click on Start Date and End Date. Then choose the dates you need from the drop-down calendar.
After selecting the necessary filters, click on Apply.
How to complain about a photo and video, you can find out further.